

Saturday, April 30, 2011
We Did It!
We did it! Today, Dragonfly Papers hit 200 (well, 201, actually) sales! You know what that means? You have a chance to score a great prize! Stay tuned next week for details on a giveaway!

Friday, April 29, 2011
Battling Deployment Blues
Living in a staurated military area such as Hampton Roads, Virginia, one is in a constant state of sending off sailors and soldiers, or welcoming them home. It seems right now my friends are in the sending off stage, and no matter how many times you've done it before, it doesn't get any easier.
For me, the first and last month of a deployment are always the worst. There's the time leading up to it, where as a couple you are prone to stupid arguments because it's easier to detach that way. Then there are the few days into a deployment where the task before you is daunting, and little things make you inexplicably sad. For me, it was doing the laundry that set me over the edge. I would be putting away his clothes and thinking to myself, "He won't be wearing these for months." It's almost a grieving process. But then the days start to go a little faster, and there are some ways to ensure that you won't be devastated by a deployment. Here are some ideas I've compiled.
1. Get a new hobby. Do something for yourself for once. You don't have to be preparing a fancy dinner every night, cause you know the kids would prefer chicken nuggets for the fourth night in a row anyway. Spend some of your extra "alone" time catching up on your scrapbook, taking dance lessons, or whatever thing it is you've been putting off. Now's the time!
2. Home improvements. Get some project done around the house you've been wanting to do. Tackle something you've never done before. That's what Google is for. I remodeled our entire bathroom while Brett was gone last time, and it felt great! Do I have any experience in this area? Absolutely not! But not only did it keep me busy, it gave me something concrete that I could look at each day and be proud of. I did that. Better yet, it gives us a sense of empowerment. Wow, I didn't think I could do that, but I did! What else am I capable of? Even if you're just painting a room, that small change can feel great!
3. Travel. This one is my favorite. Now I know many of you have school aged kids, so this might be limited to weekends and breaks, but GET AWAY! Nothing is more therapeutic than recharging your batteries with people who love you. Take a trip to your parents. Not only will they give you a break from the kids, nothing is healing like your mom's homemade cobbler. I visited fellow Navy wives that I missed, my brothers, and more! I even took a girls only trip to Las Vegas! The point is: getting away from it all is so important, and well worth the money and effort.
4. Book club. One thing I like to do during deployments is catch up on my reading. Join a group that discusses books, so you get some adult time all by yourself. Being with the kids all day is taxing, and you need time to flex your vocabulary muscles that we lose from only talking to kids.
5. Bible Study. Nothing is encouraging like reading the Bible. God made us, and knows what we need. Use this time to lean on Him, and seek His guidance. It will keep you focused on the important things, and center you on what you have to get through.
6. Set goals. What would you like to accomplish? Now's the time! Always wanted to learn to play the guitar? Ride a horse? Take hip-hop dance? Lose 10 Pounds? Focus on that. Anything will be a welcome distraction, and make the days pass faster. If you have something to look forward to each week, those weeks will be crossed off the calendar in no time!
7. Get a haircut! My husband loves my hair long, and I respect that, but I love a short cut. Now, of course I want him to find me attractive, but when he's gone... The last couple of deployments I have drastically cut off my long hair, donated it, and rocked a short cut. By the time he was back, it was decently grown in! :) You get the idea... do something for you. Get a makeover. Feel good about yourself.
8.Retail therapy. Do a little shopping. Get a dress that makes you feel pretty. Get some shoes that make you feel fabulous. Looking good sometimes equates into feeling good about yourself. Worried about money? Our men get an extra $250 for Separation Pay a month, and another $450 if they're in a Hazardous Duty Zone. Think of that extra money as a little room to have fun.
9. Surround yourself with people. Being home alone is only going to depress you. Don't set yourself up! Get out of the house. Have a lunch date with a friend. Take your kids to the park. You get the idea.
10. Exercise. We all know exercise makes us feel better about ourselves. We release endorphins, and getting thinner doesn't hurt, either. If we consistently hit the gym, we will not be down to those last two weeks trying to shed 35 pounds so we can look great when our husband gets back!
11. Girls Nights. Go out with the girls. Dress up. Be with other adults. Treat yourself to a great dinner, and dessert, too!
12. Don't Play the Martyr. Deployment sucks. There's just no way around it. But those who stay behind serve, too. We are an important part of the equation. Remind yourself of that. Just like Rosie the Riveter, WE CAN DO IT! Don't wallow in self pity. We are strong. We are independent. We are capable. You will get through this, and you will be stronger as a result! Sometimes we don't realize what we can do until we are forced to do it.
Love to you, and all military families! May God grant you peace and comfort.

My hubby on his last deployment
What has helped you get through deployments?
Thursday, April 28, 2011
What I'm Working On
Today I am working up some wedding invitation samples for my friend Katie who is getting married in September. Here are some of the ideas I came up with. Her color scheme is plum and clover, and the theme is hearts. Which invite would you choose?

#1- This invite is cream with a sage colored band and heart motif.

#2- This square invitation has an embossed band and monogram.

#3-This bi-fold square invite features a die cut design and monogram.

#4- This bi-fold design has an embossed cover, and features the couple's monogram.

#5- This classic bi-fold invitation has an embossed cover.

#5b- Here is an inside view. It has a die cut script monogram.

#6- This is a casual example. The heart is embossed with a damask print.

#7- here is another casual, simple design. It features an embossed heart.

#8- This elegant choice is square, and features a die cut overlay.

#8b- This is the inside.

#9- This invitation features an embossed band with the couple's monogram.
 #10 This invite features a large embossed heart.
So which one would you pick?

So which one would you pick?
Wednesday, April 27, 2011
Almost There!
My shop, Dragonfly Papers, is only 5 sales away from 200!! I am so excited, and wanted to announce that I will be hosting a great giveaway when I reach the monumental 200th sale! Until then, you can get 10% off your entire purchase by using the code, "GIRLS10" at checkout. And remember, 100% of the proceeds go to charity. Can't beat that!


Rosie the Riveter Card

Set of notes using real library cards

Set of three mini journals
Tuesday, April 26, 2011
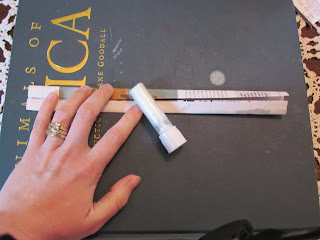
Product Review: Goody Spin Pin for Easy Up-Dos
Just want to take a minute to tell you about a new product I think is pretty cool. They are called Spin Pins, and they are by Goody. I found mine at Walgreens, but I believe they are at all major retailers, and there are even generics on Ebay (for cheap!).
So here's what they are. They are little metal spiral pins that are supposed to do the duty of twenty regular bobby pins. Intrigued? I was too. I decided to give a quick bun a try. I pulled my hair into a loose bun (no rubber band required), and inserted one spiral on top, and one on the bottom. Even with my notoriously fine, sleek hair, the spirals held my bun in place ALL DAY. They are also supposed to be great for french twists. They give kind of a loose, messy look which I like. Regular buns can make me look a little school marmish or like I'm about to put on a production of Swan Lake. I digress. The point is that I highly recommend these for a sophisticated look with no hassle.
Cost: $6.99 for two

The Civil War's 150th Anniversary
In honor of the Civil War's 150th anniversary, I thought I would post a letter my aunt shared with me today. It hails from a time before text and email, when the common man knew how to write a letter both eloquent and heartfelt. Little did this man know his letter would survive 150 years later.
July 14, 1861
Camp Clark, Washington
My very dear Sarah:
The indications are very strong that we shall move in a few days—perhaps tomorrow. Lest I should not be able to write again, I feel impelled to write a few lines that may fall under your eye when I shall be no more . . .
I have no misgivings about, or lack of confidence in the cause in which I am engaged, and my courage does not halt or falter. I know how strongly American Civilization now leans on the triumph of the Government and how great a debt we owe to those who went before us through the blood and sufferings of the Revolution. And I am willing—perfectly willing—to lay down all my joys in this life, to help maintain this Government, and to pay that debt . . .
Sarah my love for you is deathless, it seems to bind me with mighty cables that nothing but Omnipotence could break; and yet my love of Country comes over me like a strong wind and bears me unresistibly on with all these chains to the battle field.
The memories of the blissful moments I have spent with you come creeping over me, and I feel most gratified to God and to you that I have enjoyed them for so long. And hard it is for me to give them up and burn to ashes the hopes of future years, when, God willing, we might still have lived and loved together, and seen our sons grown up to honorable manhood, around us. I have, I know, but few and small claims upon Divine Providence, but something whispers to me—perhaps it is the wafted prayer of my little Edgar, that I shall return to my loved ones unharmed. If I do not my dear Sarah, never forget how much I love you, and when my last breath escapes me on the battle field, it will whisper your name. Forgive my many faults and the many pains I have caused you. How thoughtless and foolish I have often times been! How gladly would I wash out with my tears every little spot upon your happiness . . .
But, O Sarah! If the dead can come back to this earth and flit unseen around those they loved, I shall always be near you; in the gladdest days and in the darkest nights . . . always, always, and if there be a soft breeze upon your cheek, it shall be my breath, as the cool air fans your throbbing temple, it shall be my spirit passing by. Sarah do not mourn me dead; think I am gone and wait for thee, for we shall meet again . . .
Sullivan Ballou was killed a week later at the first Battle of Bull Run, July 21, 1861.
Sunday, April 24, 2011

Saturday, April 23, 2011
Green Projects: Other Great Ideas
Let me show you some other awesome green project ideas. People out there are insanely creative. Here are some of their genius creations.


This creation from Better Homes and Gardens uses styrofoam balls and fabric scraps to make an eclectic centerpiece.

This beautiful bracelet used to be a fork! Made by MarchelloArt, it is the perfect example of repurposing something!

I am willing to bet you would not be able to guess what this mini purse is made from unless I told you. Maybe if you could feel it. It has been crocheted from plastic shopping bags! That's one way to keep them out of the landfill! Made by shearmoresheep, this little baby is perfect for carrying your ID or credit cards!

I can't help but love this recycled journal, made from mailed letters and a cardboard box. I love journals, and the quirkiness of this speaks to me! It is made by badbooks.

This tote, offered by itsourearth, is made from a coffee bean burlap sack. Very cool.

Don't know what to do with all those leftover floppy discs? Curioustheatricals has made a mini journal out of theirs!
 PicaPica offers this awesome bowl, made from melted army and cowboy figures! How cool is that?


This bowl/platter, offered by Ibu, is made in the same fashion as my recycled coaster. Very nice.
Hope you've enjoyed these ideas!
Friday, April 22, 2011
Green Project: How to Make Coasters from a Magazine
Want to make something functional for your house at almost no cost at all? Want to keep the kids busy for a while? This project is for you! All you need is an old magazine, tape and a glue stick.


Tear pages out of a magazine you are finished with. My coaster used about 20 pages. You may want to choose your pages based on color. For instance, if your page is text only, it may not make for a very colorful coaster. Fold your page in half, lengthwise.

Fold your page again.

And again.

Next, undo the fold you just did, and fold the edges toward the crease. This will hide your raw edges. Apply glue all over, and fold flat.

Your page will look like this. While it is still drying and pliable, start to roll on itself. At the end of the strip, apply a piece of tape to the end, and tape to the roll.

To start the next strip, simply attach tape to your next strip, and tape to the roll where you left off. Repeat MANY times! :)

Here is the finished product.

Your coffee table thanks you.
Thursday, April 21, 2011
Green Project: Making Bows from Scrap Paper
Today's project is making bows from paper you don't need anymore. Here's what you need:
Paper or Wrapping Paper
Stapler
Double Sided Tape

Start by selecting a paper that is around letter size (8 1/2" x 11"). Cut into 1 inch strips. You will need three of the longest length, two of a slightly shorter length (about 2 inches shorter), and one strip that is about 4 inches long.
You will twist the strips into a figure eight design.

Staple in the center.

This is what your strips will look like before you assemble them.

Layer three strips on top of each other, placing a piece of double sided tape in between each.
Follow with the two smaller strips, and top with the smallest strip, which is just a circle.

You made a bow!

Here is one from a map.

And one from wrapping paper.

The finished product! You can use any paper. I am just showing recycling ideas. A piece of double sided scrapbook paper would make a beautiful bow.
Thanks for looking, and don't forget to follow the blog on the right!
Wednesday, April 20, 2011
Green Project: How to Make a Bowl from a Record
Today's project is very simple, yet makes a pretty cool piece. All you need is an old record, and you're set!


Here is my record: an old Billy Joel favorite.

Set your record on top of a bowl or mug that is oven safe, and place on a cookie sheet. Set your oven's temp to 200 degrees. (Any higher than this, and your record can release toxins.)

After five or so minutes, your record will have slumped. It is cool enough to touch. It will be flexible so you can shape it as you like. If it loses its flexibility and you're not finished, simply pop it in the oven a little longer. The record will get hard in about a minute.

Here is one of my bowls being used as a holder for my mail and keys.

Another bowl is holding candy. I would not suggest putting anything unwrapped in these bowls. They are for decoration only.
There you have it. Quick and easy art!
Tuesday, April 19, 2011
Green Project Day 2: Faux Papier Mache Eggs
So a week ago I was checking out my friend Abby's blog, and she had featured these little eggs, and I just loved the idea. I thought I would try my hand at it. Her blog Tales and Trials is really great, and you should check it out after you read mine first. ;)
Here is a very easy, very cheap, slightly time consuming project to jazz up the house for Easter, and you probably have all the materials on hand!


Here is a very easy, very cheap, slightly time consuming project to jazz up the house for Easter, and you probably have all the materials on hand!

First, start by cutting little strips of paper from a book you will no longer be needing. ( I found that narrow strips could be manipulated better, but shorter strips were great for the tops and bottoms of the eggs. )
Soak the paper in warm water until they are pliable. Being wet will make them lay flat on the egg.

These are the eggs I used. They are slightly larger than the little Easter eggs. I just liked the size better.
Put a coat of Elmer's glue or Mod Podge on the top of the egg. Lay strips in random fashion to cover the top. Then coat the bottom half with glue, and lay strips across that half. I only did this to keep you from holding a gluey egg in your hand while working.
Brush the finished product with a mixture of Elmer's and water. I used half and half. Allow to dry overnight.

Put in a cute basket, or jar as Abby did.

Voila! An Easter decoration that cost next to nothing!
UPDATE: I decided to see what an egg looked like covered in map on a whim. Here it is:

UPDATE: I decided to see what an egg looked like covered in map on a whim. Here it is:

Subscribe to:
Posts (Atom)