Showing posts with label Tutorials. Show all posts

Tuesday, March 20, 2012

Scripture Canvas Tutorial

     After seeing canvas after canvas on Pinterest, I decided to give handmade art a chance for my upcoming nugget's nursery.  I searched for quotes about kids, boys, babies, and finally found a scripture I loved.  It is from the book of Samuel, and the speaker is Hannah, who thought she would never have a child, but was blessed with one after years of heartbreak.  God rewarded her faithfulness, and her words were immortalized in the Old Testament.  I knew it was the perfect verse because I, too prayed for my precious little one, and am so thankful that he's about to be in my arms! 
     This project is simple, but slightly time consuming.  However, it was fun, so it made this fussy little project go fast.  Here's how I did it.

 I started with a large canvas from Michael's.  It was only $11 after I used a 40% off coupon.
I cut letters out of cardstock on my Cricut machine to get a feel for how the layout would look.  This gave me an idea how large I wanted the letters to be, and how the spacing would look.  If you do not have a Cricut, you can still wing it by buying letters at your local craft store, and skippping this step.


 Once I was satisfied with my layout, I cut the letters out of vinyl on my Cricut, and put them in place where the paper ones had been.  This allows for (almost) perfect spacing.

 I wanted my background to be a navy color, but I didn't want it to be plain blue, so after mixing various shades of blue, I liberally spread the paint all around the canvas, covering the letters.  You want to ensure that the letters are stuck very well in this stage, so your paint doesn't bleed where you don't want it to.

After you have allowed your canvas to dry for several hours, peel the letters off, and behold!  I colored in one word with a permanent marker because I liked the way it looked.  Your letters should have pretty clean edges, but you can always touch them up with a paint pen, or some White Out.

Obviously, there are many inspirational quotes and scriptures you can use, so get those creative juices flowing!


Wednesday, February 1, 2012

Prayer Journal Tutorial

     I have been so blessed the last few months to be leading a bible study at my church.  The women are terrific, and I am learning so much in the process.  One important part of our meeting is prayer time when each woman can share what is going on in her life, and the other members remember her in prayer throughout the week.
      Prayer is a huge part of our faith.  It is our way to commune with God, and petition him our requests.  What an honor to talk to the maker of the universe, and a priviledge to lift up others' troubles to him.  In my quiet time last week, I started thinking about prayer and our daily walk with God.  I have been reading through the Old Testament, and one thing that has stood out to me is God's desire for us to remember him, and what he has done for us.  So often we pray and pray, and when we get an answer, we say a quick thank you, and forget about it soon after.  There are numerous times in the Old Testament when God actually commands his people to do things in remembrance of his mighty works.  In Deuteronomy, when God instructs the Israelites how to tithe, they are to bring their offerings forward, and they recite a speech of sorts, listing the ways God had been good to them.  They are to recall how they were saved from the Egyptians, were given the Promised Land, and shown many miraculous signs.
     Jewish traditions that still exist today orginated in God's command to remember a certain event.  Passover is celebrated to remember their escape from Egypt, and the death of the firstborn.  Purim is celebrated to remember how God delivered the Jews from destruction during the Persian Empire.  Countless festivals were instated so people would be routinely reminded what God had done for them.
     Often in the Old Testament, God commands someone to build a monument to something, or name a place something as a tribute to what happened there.  When Joshua led the Israelites across the Red Sea, God instructed him to have each tribe pick a large stone from the center of the water and place it on the other side.  He also instructed the Israelites to tell their children and childrens' children the story of God's divine intervention.
     Why am I making such a big point of this?  We know God is the same God yesterday, today and forever.  I think God wants us to constantly be reminded of what he does for us, too.  When we attended  a bible study in Virginia, we were given prayer journals.  On one side, you wrote down the prayer request of your own or someone else's, and on the other, you made a notation when and how that prayer was answered.  It was so interesting to look back and see God's undeniable hand on each person's life!  I still look back at my journal from time to time to be reminded of just that.  I wanted the ladies from my current bible study to experience the same thing, so I made a (slightly prettier) version of the prayer journal.  Here is how I did it.
     First, I cut a cover from a 12" piece of sturdy scrapbook paper with the dimensions of 11 1/2" x 8 3/4".  I took a piece of letter sized cardstock and folded it in half.  This became my page divider.  I cut tabs at 2 1/2" x 2" and folded them in half.  I used a corner rounder to make them look like tabs on a file folder.
     Next, I formatted a Word document for the prayer pages.  I made the orientation a landscape, and chose a 2 column format.  I typed the words, "Name and Prayer Request" on the left side, and, "Way prayer was answered on the right side."  I printed 5 of these double sided. (We have 10 women in our bible study, so this allows for 12 people's requests.  Make more if you have a larger group.)


On a second page I made a cover for the prayer request journal which had a title and bible verse.  On the back I printed the first page again.  This will all make sense when you do it.  It ensures that your book will read like a book without any missing pieces.


Once all the pages were printed, I folded them in half and organized them like a book.  I placed them in the folded cardstock sheet that serves as a page divider (with tabs on each side), and placed that inside the cover.  I stapled everything together along the spine with a super big stapler.  If you do not have access to one of these, you may want to bind your journal with a piece of tied ribbon.


I left a place in the back for the handouts I give during the course of the study.  They are loose, but stay put pretty well.


Here is the stack of finshed books ready for Friday's study.  Now we are all set to record the concerns of others, and remember months and years from now how faithful God is to us.


Rejoice always, pray continually, give thanks in all circumstances; for this is God’s will for you in Christ Jesus.
1 Thessalonians 5:16-18

Sunday, January 22, 2012

Cheap to Chic: Finishing Touches

     We moved to Rhode Island last June, but I am still putting the finishing touches on the boys' room.  Nothing like the impending arrival of yet another boy to get you in gear!  You may recall my personalized oar tutorial, which I used as a piece of decor to tie together the nautical theme.  I still have a ways to go, but I wanted to show you a couple of new additions to the room.
     Months ago, I saw the cutest little wooden chair, and I knew it would be an adorable addition to the room.  All I had to do was sneakily cross the street, and nab it from my neighbor's trash pile out for pickup. (Don't judge, it was very sturdy, and I couldn't bear to see it go to the landfill!) I gave it a new coat of paint, and it is like new! Nolan loves sitting in it while he watches Thomas the Train.


 Here is the chair to start.  It needs a little TLC.


 Here it is after a coat of spray paint.  Note: I couldn't find the red color I wanted in satin finish, so I bought a glossy paint, then shot a layer of clear satin over it.  Easy!


Here is a close-up.

Next, I took an old cracker crate and made a book shelf out of it.  It was as easy as putting some anchors into the wall, drilling two holes in the crate, and hanging it on the wall.  Look how cute it turned out.

I put some old books and a little globe inside, and I think it adds a lot of visual interest to the room.

 I bought the crate at a flea market for $5 a while back.


I love the old lettering on the side of it.


My husband Brett had the idea to frame a nautical chart for an authentic feel for our little sailors.  He's in the Navy, so he knows about these things. :)


Next up is a new bed for Hudson and and quilt, too.  Stay tuned!

Sunday, December 11, 2011

A Handmade Christmas

     This Christmas I am going for a more homespun feel.  I am wrapping my presents in kraft paper, and making many of my gifts. I decided to carry this through to our Christmas tree, and make a popcorn garland and ornaments by hand.  It didn't hurt that our movers lost all our Christmas stuff during the move to Rhode Island, and we now are starting from scratch. It is working out fine, though. I have to say, I love the look of a handmade Christmas. 
     I made some of our ornaments using an old fashioned recipe of applesauce and cinnamon.  They are so cute, and the smell in our house is divine!  Here is the recipe I used:

1/2 cup applesauce
1 container of cinnamon
extra cinnamon
1 Tablespoon flour


     I mixed the applesauce and cinnamon in a bowl with the flour until it was a nice dough-like consistency.  You will have to do this by "feel."  You do not want it to be too sticky or too crumbly.  I know cinnamon can be a little expensive if you buy it at the grocery, so try finding it at the dollar store, or some place similar.  I found mine at a local store called the Christmas Tree Shops for 89 cents.

    
 Roll your dough out on wax paper after dusting the paper with cinnamon.  Dust the top of the dough with cinnamon as well. This will keep your dough from sticking to your rolling pin. (Flour will discolor your ornaments.)  Use cookie cutters to cut shapes into your dough.  You will need to poke a hole in each ornament with a straw to thread ribbon through it later.
     Bake shapes in your oven at 200 degrees for 2 1/2 hours.  I know this sounds like forever, but it will make your house smell awesome! When the time is finished, place on cooling racks.  They may need to dry a little bit more before you hang them up.  Note: If you wish to forego the oven method, you may lay out the ornaments for several days on drying racks.


     When your ornaments are completely dry, run some ribbon through them, and hang on your tree!


I hope you are enjoying getting ready for the holiday like I am!
Merry Christmas!


Tuesday, December 6, 2011

Photo Ornament Tutorial (Gift Idea for Under Two Bucks!)

     These ornaments are the perfect homemade touch for your tree, and would be a great gift for the grandparents.  Plus, they are simple and cheap to make!

First I started with plastic bulbs I bought at Michaels.  They were on sale for $1.49.  They look just like glass (which make them hard to photograph!), but they are sturdy plastic, so they might actually last a while!

I took a photo of each our boys and cut a 3" circle of each.  I then punched a small hole in the top and tied a string through it.  When I put the top back on, it held the string in place ensuring that my picture would not be floating around the bulb.  I rolled the picture up to fit it through the hole in the top of the ornament.

I cut an entire 8 1/2" x 11" piece of scrapbook paper into (roughly) 3/4" x 3" strips, and rolled them on a toothpick to make little paper "shavings."  I placed these paper pieces in front and behind the picture to hold it in place.

I replaced the top, and tied a cute ribbon through it.  There you have it! A festive little goody! This is one of the gifts I included in my mom's 12 Days of Christmas. Here are some more pictures.


Cost:
Ornament: $1.49 at Michaels
Picture: $.12 at Walmart
Ribbon and Paper: I had on hand

Total for each bulb: $1.61!

Time: 1 Hour


Thursday, November 17, 2011

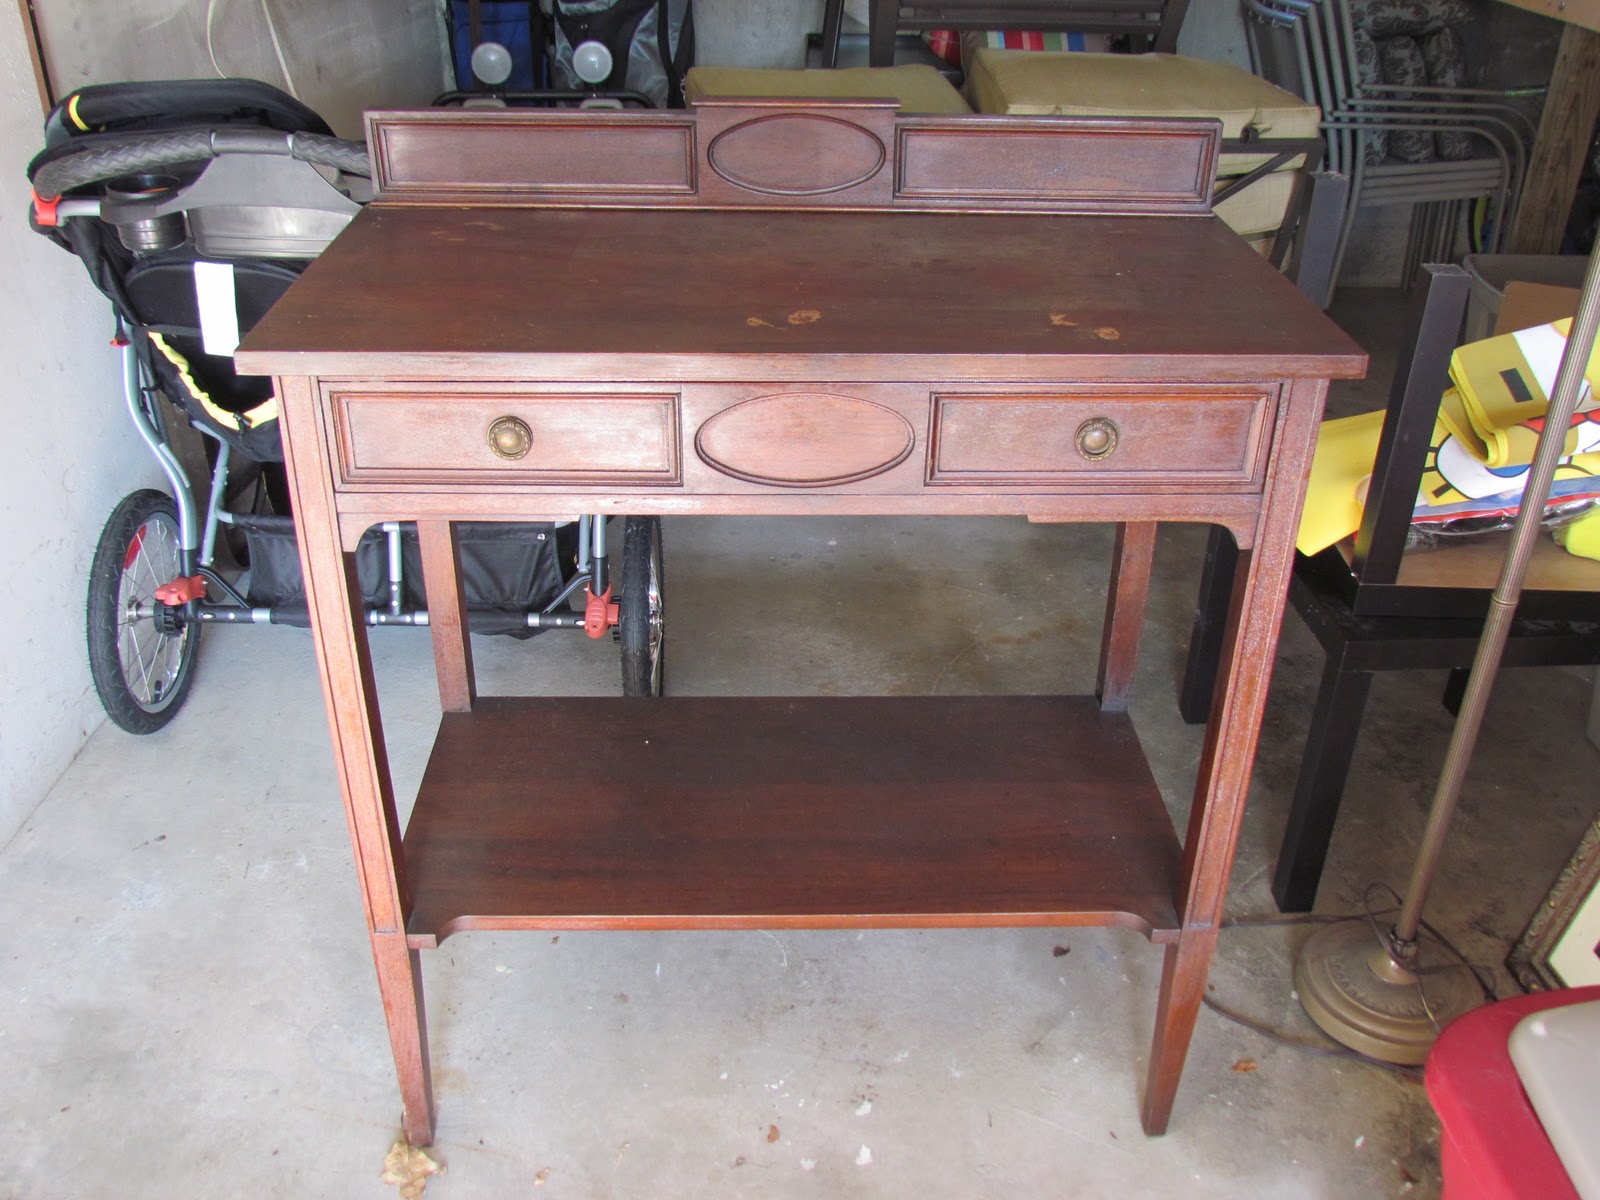
Cheap to Chic: Kitchen Buffet Refinish

     Our house here in Newport has an awesomely big kitchen.  At first, I thought a dinette was the solution to fill up some of the extra room, but since our dining table was literally on the other side of the wall, I thought that was a little redundant.  I had been looking for a side table or some accessory piece to help organize my junk, and I finally found something I loved at a local thrift store which donates all proceeds to the less fortunate.  Double score.  Here's what I did to turn this cheap buffet into a chic conversation piece.

 This is my buffet to start.  You can see it has been beat up a little.  This piece would have been lovely if I had left it its natural wood color, but I really had it in mind to make it a little more contemporary. 


 This is another view.  Don't judge me by my junky garage.  There are a lot of future projects sitting around.

I removed the hardware, sanded the piece down, and added two coats of aqua paint.  Once it dried, I roughed up the edges by sanding them.  This gives the buffet a slightly distressed look, which is perfect for our household.  Now when someone hits it with a baseball bat or scratches it in a move, I won't be disappointed!


 Here is the finished project in my kitchen. 


Here's another view.  I am pretty pleased with the result, and the drawer will hide all my random paperwork.

Cost:
Buffet: $60
Paint: $10

Time:
One afternoon


Tuesday, November 1, 2011

Tutorial: Embossing Tin Foil

     I know some of us may not want to think about it, but Christmas is just around the corner.  If you're anything like me, you start late and then are so stressed out, the season's meaning is lost.  I have resolved that will not be me this year!  I love making gifts and cards for loved ones, and this year, I will start early, and enjoy every minute of it!
     Today's tutorial is for those of you who have an embossing machine or plates sitting around.  If you have one, you know how fun and easy it is to make something look really spohisticated in a matter of seconds.  The other day I had a brain storm about a common material we all have sitting around the house: tin foil.  It's the perfect way to add a little glitz to our Christmas cards and tags!  So here's what I did.

 I cut a piece of cardstock to be slightly smaller than my card.  I then roughly cut a piece of tin foil to cover the paper.  As you can see, the foil does not have to be perfect.


 This shows how I simply folded the tin foil over the cardstock.


 I placed my foil covered paper in a Cuttlebug embossing folder and ran it through my Cuttlebug.


 Look how great it turns out! 
The best part is that the embossed design will hold because the sturdy cardstock is supporting it.

Here is a simple card I made with my foil plate.  Merry Christmas, everyone!

Want to get handmade cards the easy way?  I have started stocking my Etsy shop, Dragonfly Papers with Christmas cards for every taste.  Check them out, and keep an eye out as I continue to add more designs!

Wednesday, August 10, 2011

Tutorial: Make a Dry Erase Board for Under $5!

     Nothing keeps me organized like a list, but the OCD side of me has to make a new list as I cross things off, cause who likes a messy list?  The result is 17 little scraps of paper a day.  Well, no more!  Yesterday when I was at Walmart, I swiped a $3 picture frame from their cheapie section, and went to town.  Here's what I made and how I did it.


 Here is the junky frame to start.


 I painted two coats of craft grade acrylic paint (the kind that costs less than a buck at Michael's), and sanded some areas for a shabby chic distressed look.  Here is a close-up of the distressing.

I then cut a piece of coordinating scrapbook paper and placed it in the frame.


The finished product!  As my tasks are completed, I simply wipe them off the board!

Cost: 
Frame $3
Dry erase markers (set of 2) $1.47
Paper and paint (I had on hand)

Time:
1 Hour

Thursday, July 14, 2011

Recyling an Old Letterpress Drawer

     If you're anything like me, you love vintage junk goodies, and love to find new purposes for them.  Case in point: I have always loved seeing letterpress trays at flea markets and antique stores, but what the heck do you do with one?  (Contrary to popular belief, I am not a hoarder of useless items.)
     A printer used to have to type set each letter in order to print newspapers and such.  They would lay out letters in a row, and after inking a plate, press paper against the letters to create an imprinted image. Hundreds and hundreds of letters would need to be stored, and they were neatly organized in drawers and put into large cabinets.  Since modern technology has made letterpress almost obsolete, you see these trays for sale from time to time.  But back to my original question.  What the heck could you use one for now?
     After spotting one for $8 at a flea market, I decided I would purchase now, and decide later.  Fast forward a year, and I have finally gotten around to making it something.  I decided to make it a showcase for old family photos, and hung it on the wall in my craft room. It is a work in progress, as I will probably be tweaking it here and there as I find little goodies small enough to fit in the compartments.

 Here is how my letterpress drawer started.  It was in pretty rough shape, and needed a serious cleaning with a toothbrush and some water. I then cut photos and slips of decorative paper to fill in certain sections.

Here is the tray from a distance, so you can get the gist of what it looks like on the wall.  Note the cool antique cup pull on the front (now bottom) of the drawer. This drawer is likely over 100 years old!

I added the word "Family" in the center of the tray to set the theme.  I cut out the letters using my Cricut machine (of course) and the "Stamped" cartridge.

This key was found in an old family desk, and no one has a clue what it went to.

This dapper gentleman is my great-grandfather.  Thank goodness I didn't inherit his ear genes.  Does he look Irish, or what?

The little holes I filled with teeny pictures, which are easier to find than you would imagine.  Most old pictures are pretty small.  Those that are not you can crop or edit them to fit.

Some of the empty spaces I filled with decorative paper including pages from hymnals and dictionaries. I also like the look of some of the spaces being empty.  This was a fun project, and a great way to showcase some tiny old photos that probably would not have been suitable for framing.

Don't forget about our giveaway!  Dragonfly papers is giving away a recycled Nancy Drew journal and your choice of note card sets from our shop.  Check out the details HERE.

Tuesday, July 5, 2011

Decorating Our Guest Room

     This week I have been trying to tackle those crafty projects that I meant well with, but never got to.  In just a couple of weeks, my brother and his wife will be here to visit {insert squeals of joy here}.  I am so excited to see them.  So in preparation of their arrival, I have been getting the guest room squared away.  Here are a couple of little things I did.

 I took a cheapie mirror from the Christmas Tree Shops and gave it a shabby chic finish.  It started out as bronze.


 Here is a close-up.  I achieved this look by giving the mirror a couple coats of white paint, waiting for it to dry, and sanding spots on the frame to give it a worn, antique look.


 I added a little visual interest with this framed "art."


 I bought this frame for $5.99, and used red patterned scrapbook paper as a background.  Places like Marshalls, Ross, and TJMaxx have the best prices on frames. I cut out the word "hope" using my Cricut machine and the "Stamped" cartridge. The alarm clock I snagged at IKEA for $5.  I love its vintage look.

Getting a little closer!

Have a great day!