Sunday, December 11, 2011

A Handmade Christmas

     This Christmas I am going for a more homespun feel.  I am wrapping my presents in kraft paper, and making many of my gifts. I decided to carry this through to our Christmas tree, and make a popcorn garland and ornaments by hand.  It didn't hurt that our movers lost all our Christmas stuff during the move to Rhode Island, and we now are starting from scratch. It is working out fine, though. I have to say, I love the look of a handmade Christmas. 
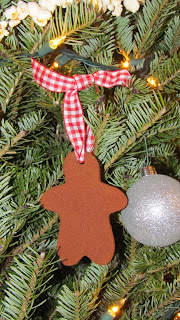
     I made some of our ornaments using an old fashioned recipe of applesauce and cinnamon.  They are so cute, and the smell in our house is divine!  Here is the recipe I used:

1/2 cup applesauce
1 container of cinnamon
extra cinnamon
1 Tablespoon flour


     I mixed the applesauce and cinnamon in a bowl with the flour until it was a nice dough-like consistency.  You will have to do this by "feel."  You do not want it to be too sticky or too crumbly.  I know cinnamon can be a little expensive if you buy it at the grocery, so try finding it at the dollar store, or some place similar.  I found mine at a local store called the Christmas Tree Shops for 89 cents.

    
 Roll your dough out on wax paper after dusting the paper with cinnamon.  Dust the top of the dough with cinnamon as well. This will keep your dough from sticking to your rolling pin. (Flour will discolor your ornaments.)  Use cookie cutters to cut shapes into your dough.  You will need to poke a hole in each ornament with a straw to thread ribbon through it later.
     Bake shapes in your oven at 200 degrees for 2 1/2 hours.  I know this sounds like forever, but it will make your house smell awesome! When the time is finished, place on cooling racks.  They may need to dry a little bit more before you hang them up.  Note: If you wish to forego the oven method, you may lay out the ornaments for several days on drying racks.


     When your ornaments are completely dry, run some ribbon through them, and hang on your tree!


I hope you are enjoying getting ready for the holiday like I am!
Merry Christmas!


Tuesday, December 6, 2011

Photo Ornament Tutorial (Gift Idea for Under Two Bucks!)

     These ornaments are the perfect homemade touch for your tree, and would be a great gift for the grandparents.  Plus, they are simple and cheap to make!

First I started with plastic bulbs I bought at Michaels.  They were on sale for $1.49.  They look just like glass (which make them hard to photograph!), but they are sturdy plastic, so they might actually last a while!

I took a photo of each our boys and cut a 3" circle of each.  I then punched a small hole in the top and tied a string through it.  When I put the top back on, it held the string in place ensuring that my picture would not be floating around the bulb.  I rolled the picture up to fit it through the hole in the top of the ornament.

I cut an entire 8 1/2" x 11" piece of scrapbook paper into (roughly) 3/4" x 3" strips, and rolled them on a toothpick to make little paper "shavings."  I placed these paper pieces in front and behind the picture to hold it in place.

I replaced the top, and tied a cute ribbon through it.  There you have it! A festive little goody! This is one of the gifts I included in my mom's 12 Days of Christmas. Here are some more pictures.


Cost:
Ornament: $1.49 at Michaels
Picture: $.12 at Walmart
Ribbon and Paper: I had on hand

Total for each bulb: $1.61!

Time: 1 Hour


Monday, December 5, 2011

12 Days of Christmas Gift Idea

     My mom is an absolute nut about Christmas.  She carols her neighbors every Christmas Eve, shops for presents all year long, and keeps a nostalgic childhood Christmas tree up all year round.  This year will be the first that none of her children are home for Christmas day. I wanted to do something special to lead up to the big day when her grandkids would be knocking on her door.  She has always loved, "The Twelve Days of Christmas" song, so I did a little spin on it to personalize it for her.  I picked out some of her favorite candy, made some sentimental goodies, and bought some items for the holiday festivities. Here is what some of the packages look like.  If your special person lives close, you may want to consider delivering a package each day.  You could leave it in their car, on their doorstep, in their mailbox, etc.  My mom lives a long ways away, so I will box everything up, mail it, and hope I can trust her to open one at a time!

I love the kraft look, so I wrapped my presents in brown paper bag wrap I found at my local Dollar Tree. 

 I cut out some snowflakes the old fashioned way, and others I cut with my Cricur machine.  I also cut tags and numbers with my Cricut.


 I love baker's twine!  The floral piece on this package also came from Dollar Tree.


This snowflake was cut out with my Cricut.

Here are some ideas for your 12 Days of Gifts:
Picture albums
Candy
Bath goodies
Books
A CD of holiday music
Favorite recipes
Cookie cutters
A small piece of jewelry
A calendar for the coming year
Handmade ornaments
Anything else you can imagine!


Thursday, November 17, 2011

Cheap to Chic: Kitchen Buffet Refinish

     Our house here in Newport has an awesomely big kitchen.  At first, I thought a dinette was the solution to fill up some of the extra room, but since our dining table was literally on the other side of the wall, I thought that was a little redundant.  I had been looking for a side table or some accessory piece to help organize my junk, and I finally found something I loved at a local thrift store which donates all proceeds to the less fortunate.  Double score.  Here's what I did to turn this cheap buffet into a chic conversation piece.

 This is my buffet to start.  You can see it has been beat up a little.  This piece would have been lovely if I had left it its natural wood color, but I really had it in mind to make it a little more contemporary. 


 This is another view.  Don't judge me by my junky garage.  There are a lot of future projects sitting around.

I removed the hardware, sanded the piece down, and added two coats of aqua paint.  Once it dried, I roughed up the edges by sanding them.  This gives the buffet a slightly distressed look, which is perfect for our household.  Now when someone hits it with a baseball bat or scratches it in a move, I won't be disappointed!


 Here is the finished project in my kitchen. 


Here's another view.  I am pretty pleased with the result, and the drawer will hide all my random paperwork.

Cost:
Buffet: $60
Paint: $10

Time:
One afternoon


Wednesday, November 2, 2011

Christmas Cards are Hitting the Shelves!

     Just wanted to share some of the goodies that are hitting the "shelves" this week.  Be sure to keep an eye out for new additions in the coming weeks.  Remember, 100% of my sales benefit a missionary family who feed the homeless and takes care of orphans, so you will be doing something so meaningful while buying your greetings this year!   
     Some of these designs are one-of-a-kind, so get them while you can!


Do you follow my blog?  It's as easy as a click, and makes me feel all warm and fuzzy inside.  Thanks!

Tuesday, November 1, 2011

Tutorial: Embossing Tin Foil

     I know some of us may not want to think about it, but Christmas is just around the corner.  If you're anything like me, you start late and then are so stressed out, the season's meaning is lost.  I have resolved that will not be me this year!  I love making gifts and cards for loved ones, and this year, I will start early, and enjoy every minute of it!
     Today's tutorial is for those of you who have an embossing machine or plates sitting around.  If you have one, you know how fun and easy it is to make something look really spohisticated in a matter of seconds.  The other day I had a brain storm about a common material we all have sitting around the house: tin foil.  It's the perfect way to add a little glitz to our Christmas cards and tags!  So here's what I did.

 I cut a piece of cardstock to be slightly smaller than my card.  I then roughly cut a piece of tin foil to cover the paper.  As you can see, the foil does not have to be perfect.


 This shows how I simply folded the tin foil over the cardstock.


 I placed my foil covered paper in a Cuttlebug embossing folder and ran it through my Cuttlebug.


 Look how great it turns out! 
The best part is that the embossed design will hold because the sturdy cardstock is supporting it.

Here is a simple card I made with my foil plate.  Merry Christmas, everyone!

Want to get handmade cards the easy way?  I have started stocking my Etsy shop, Dragonfly Papers with Christmas cards for every taste.  Check them out, and keep an eye out as I continue to add more designs!

Thursday, October 27, 2011

Product Review: Big Sexy Hair

     Sorry I've been gone so long, folks.  I am currently pregnant with baby #3, and have found myself hanging out with the toilet most days.  (TMI, I know!)  If you've been there before, you know exactly what I'm talking about.  If you're one of those women who claim to have no sickness whatsoever, and feel fantastic for all 9 months, and also lose 10 pounds in the delivery room overall, promptly stop reading this blog, and go suck on an egg.  For those of you still here, I have a pretty great product to talk about.
     October marks the Navy's birthday, so my husband and I attended the Navy Ball here in Newport, RI.  Newport is incredibly expensive, and when I called around to see what a simple updo would cost, the cheapest I found was $60.  That's more than I spend on a haircut, folks.  What's a girl to do but give it a shot herself? I mean, come on, my dress cost $1 at a yard sale.  I wasn't about to blow all that cash on something that would look good for a few hours.
     The last time I got a haircut the stylist gave me some free samples.  Included in those was a small bottle of Big Sexy Hair hair spray.  Now I have tried to tease my hair before, but it's so fine, even the rats nest I create flattens out in a matter of minutes.  I resolved to watch some YouTube videos and see how the pros accomplish the poof.  P.S. If you ever have a minute, these videos are hilarious. 
     So, following the video's instructions, and trying out my trusty (free) Big Sexy Hair, I was able to get lift that would make Snooky jealous.  This product creates crazy volume and hold.  I would HIGHLY suggest it.  Go on, get your tease on!

Here is the product.

It's too dark to see my poof here, but this is the only photo we got of ourselves!  Total look: $1! :)

Wednesday, August 10, 2011

Tutorial: Make a Dry Erase Board for Under $5!

     Nothing keeps me organized like a list, but the OCD side of me has to make a new list as I cross things off, cause who likes a messy list?  The result is 17 little scraps of paper a day.  Well, no more!  Yesterday when I was at Walmart, I swiped a $3 picture frame from their cheapie section, and went to town.  Here's what I made and how I did it.


 Here is the junky frame to start.


 I painted two coats of craft grade acrylic paint (the kind that costs less than a buck at Michael's), and sanded some areas for a shabby chic distressed look.  Here is a close-up of the distressing.

I then cut a piece of coordinating scrapbook paper and placed it in the frame.


The finished product!  As my tasks are completed, I simply wipe them off the board!

Cost: 
Frame $3
Dry erase markers (set of 2) $1.47
Paper and paint (I had on hand)

Time:
1 Hour

Thursday, August 4, 2011

New Items In New Shop

     Just wanted to show you some goodies that are being placed in my new shop, the Vintage Scrap Company this week.  Vintage Scrap specializes in vintage goodies, and items that will give your crafts a vintage feel. Stay tuned for more!

 Set of vintage doilies


 Square scallops punched from a Nancy Drew book


 Vintage bingo cards


 Bingo pieces


Don't forget to enter The Jensen Family Circus giveaway for a free stationery item from Dragonfly Papers!

Tuesday, August 2, 2011

Blog Giveaway Bonanza!

     If you missed the giveaway featured here the last couple of weeks, don't fret because you have another chance!  That's right, it's another blog giveaway!!  My friend Kristy, of the Jensen Family Circus is hosting a giveaway from my shop, Dragonfly Papers, on her blog.  Kristy is the mom of two sweet little boys, and shares her daily routines, struggles, and funny stories.  She also has great recipe ideas and book reviews.  Kristy is a woman of God, and shares her insight on God's word and will in her life.  It's a great read, so you should check it out!
     The giveaway will run for the next two weeks.  Simply follow the directions on her post to enter up to three times.  If chosen, you will win whatever item you would like from my shop!  Here are some ideas:


Good luck!

Monday, August 1, 2011

Giveaway Winner!!

Congratulations to Kristy, who won the Nancy Drew journal and her choice of note cards from our shop, Dragonfly Papers!  Please email me at wecandoitblog@yahoo.com with your address and desired note card set.  Thanks for participating, everyone!

Saturday, July 23, 2011

Wedding Invitation Consultation

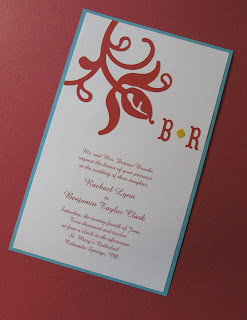
     A bride contacted me recently with the request for some invitation samples.  Her colors are very trendy: Dark orange, aqua and yellow, and she would also like to incorporate a Victorian flavor.  I love a good challenge, and I love how tongue in cheek the idea of juxtaposing styles is.   Here are the samples I came up with.


Which would you choose?

Don't forget to enter my stationery giveaway.  The winner will be announced August 1st!